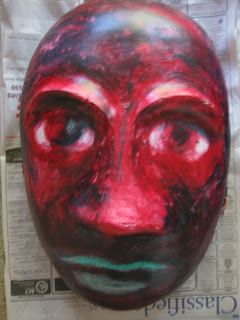
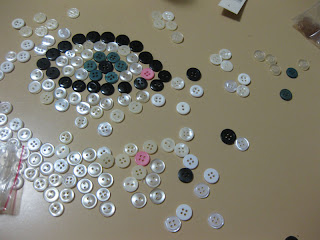
My studio project this term is about personality and identity. I am interested in the idea that we create characters which we present to others - the good daughter to our parents, the competent professional in our workplace, the cheery buddy to our friends, the caring parent to our children. But who are we really? I have decided to develop the concept of 'masks' as a way of exploring this. Here is my journey so far.
I have incorporated many of the techniques and ideas we have explored during workshop classes in these maquettes and in the masks.
First I made a mask out of two commercially purchased paper mache masks. Then I covered it with paper mache ::
1. I then used bandage and plaster to make a half face mask:
I built up the 'nose' a bit because I wanted to make a donkey type mask, like the one on the character who features in studio print project.
I trimmed the mask when it was dry, then painted eyes onto it. Then I glued fake fur fabric.
I made ears and stapled them on, and then painted the fur.
 |
| eyes and fur! |
 |
| ears, and paint |
This wasn't made as a mask to wear. I wanted it to look as if someone was wearing it.
2. Then I made another mask using the same paper mache one I used for the donkey mask. This time I covered the mask in thin plastic wrap, soaked cloth in PVA glue and then draped the cloth over the mask.
I then painted this with coloured paper pulp, but unfortunately don't have a photo of that. This portrait is an example of the work we did with Paul during our paper casting workshop. The paper painting I did on my mask looked like vomit, so I decided to paint over it.
Here is the painted mask.
3. Next I decided to paper over the first paper mache mask with green tissue paper.
I discovered one of the great aspects of 'play' when I did this. It was not my intention to leave the mask like this, I was just experimenting with surfaces. But I really liked this effect.
Next I used Photoshop and my Wacom tablet to experiment with painting on the green and white mask. I was not keen to work directly on it for fearing of 'ruining' it. Not a very creative strategy, but fortunately Photoshop is a very creative program and I had some fun experimenting with what I could do to the mask and in the process let go of the idea of keeping it as it was.
 |
| played with contrast and added blue shading |
 |
| changed the colour and continued to play with contrast and shading |
Next I decided to paper over the mask with rice paper and then I poured and painted ink over it.
4. By this stage I decided that I wanted to make 'multiple' masks so that I could explore masks as tools for adapting or adopting identity. I didn't want to continually work over one mask (although the possibilities of this, photographing the results, using photoshop to animate the process.....hmmm, very tempting) so making multiples was the way to go.
We did a workshop with Paul on making latex molds so I decided that was the process I would use.
First I had to create a model of the mask. I wanted to make it larger than life size because I didn't want my masks to look like something that could be worn. I wanted to evoke the associations of masks (adapted identity, anonymity, drama, theatre and so on) without the masks actually looking like theatrical or dance masks.
The model was to be made of clay, with a base made of scrunched up newspaper wrapped in plastic bags.
Then wrapped in plastic and taped together to make a basic form.
Then I added the clay over the top.
I wanted a strong, androgenous look. Simple but powerful, and suitable to be the 'canvas' which I would work on.
Next I had to started painting latex onto the clay. There was some thick latex at college which I used for this.
 |
| latex brushed around the edge to make a border and then over the whole clay model |
Next I put a layer of cotton wool around the edge, between the mask and the border layer to make that area strong.
I bought commercial cotton wool balls, unrolled them, soaked them in latex and them 'painted' them around the angle between the mask and the board it was sitting on.
Next the whole mask is covered in two layers of stocking material (the stockings women wear), which is painted onto the surface of the mask with more latex.
At this point I needed liquid latex, which I purchased from ACT Fibreglass in Fyshwick. The 1200ml of latex cost $36. The six pairs of stocking I bought cost $10. I also needed a cheap brush because using latex pretty much wrecks the brush you use, so it is worth buying a cheap one, cleaning it carefully while doing the latex applications, and then discarding it. The brush cost $1.50.
 |
| cut up pieces of stocking, liquid latex, working around the edges first |
Here is the latex mold with two layers of stockings, then a final coat of latex.
I let the whole thing dry overnight. Then it was time to make the bedding mold.
First it must be decided how many pieces of bedding mold is needed. This depends on where undercuts are. On my mask it was easy because it is a very simple shape with almost no undercutting.
We decided to make a two part bedding mold.
First I needed to make a 'wall' of clay. This needs to be supported on the side which is NOT having the plaster applied first, so that it doesn't fall over.
Then a firm coat of modelling plaster is applied to directly to the latex, up to the 'wall' of clay.
This is allowed to dry, then the clay 'wall' is removed and a thin coat of plaster and water 'slip' is painted onto the dry plaster to ensure that the two parts will separate easily, and then the other side of the plaster mold is applied.
 |
| when the second side of the plaster mold is dry, the two parts are easily separated with a chisel or screw driver |
The latex mold and bedding mold.
The bedding mold needs to sit firmly inside a basket or box. Then the latex mold can sit inside it and it is ready for the masks to be made.
I made a plaster mask first, then four more using cloth and plaster. The cloth bandage and plaster masks are lighter than just plaster and are still quite strong.
I have made five so far.
I have been experimenting with ideas for how I am going to proceed with the masks.
Photoshop:
Maybe using buttons - evoking primitive masks decorated with shells and other natural objects. In my case using man made items which reflect my cultural milieu.
Still working on the large masks!


