Saturday, November 24, 2012

Developing and printing the 'donkey girl' images


I bought a large sheet of copper and got it cut into 15cm/21cm pieces. I wanted eight images and drew and painted about 40 different images and versions of the images from which I eventually chose the eight that I have selected so far.

After settling on the images I then had to work on drawing them to make them fit meaningfully into the size and format that I had chosen for these prints.

I bought bitumen and ferric chloride crystals so that I could prepare and etch the copper plates at home. I read about Paula Rego's prints and found that she paints on the bitumen paint with white gouache before etching. This sounded like a good idea and I found it a very good way of setting the image onto the copper plates before I started with the scratching tool. The black plates with the white drawings on them looked quite good!

Above you can see the plates with the white gouache on them, and one of the plates which has subsequently been drawn into the with tool that draws into the bitumen.

the drawing tool and the white ground on the bitumen paint

Once the eight plates were ready to be etched I had to research how to turn the ferric chloride crystals into the correct strength solution. I found a good, detailed article here and used that. If you do this at home yourself it is well worth doing some thorough research because there are some big safety issues with making an acidic solution which must be observed. One really important this with ferric chloride is that you add the crystals to water, not the other way around. A chemical reaction resulting in sudden, intense heat occurs.  The solution has to be left overnight to cool before being used. It is stored in plastic which is suitable for the storage of chemicals (like that for petrol or oil). 

Once I had made the solution I diluted it 1:1 with water and did a test run on the copper plate which I'd used in the original workshop. I covered the previous image with contact plastic and used the other side of the plate. I tested the etching solution from 5 - 50 minutes at 5 minute intervals. I found that there was no appreciable difference in the amount of etch past 25 minutes of immersion in the solution. I wanted the plates to be evenly etched, so 25 minutes it was.

I etched all of the plates, cleaned off the bitumen with turps and then had the fun job of bevelling and smoothing the edges of the plates. This reduces the risk of the edges of the copper cutting the paper when you are printing and also reduces the amount of unintentional 'border' line around the image being printed.


Thursday, October 18, 2012

Paper mask

Following on from the explorations of the potential of the bandage/plaster masks, here is the mask made from rice paper, using the latex mold.


When I decided on trying to make a paper mask using the mold I particularly wanted a translucent effect. It can be seen here, with the mask pinned on a window.


Here is the drawing I did with the tablet,


and here is the painted mask::


I might do some more work on this, maybe make another mask!!

Wednesday, October 17, 2012

White mask fever!

White mask fever has been crippling me. I put off making a decision about what to do with the masks by trying out making a rice paper one.  It will be interesting to see how it comes out of the mold.


The other masks were still staring sightlessly at the ceiling.


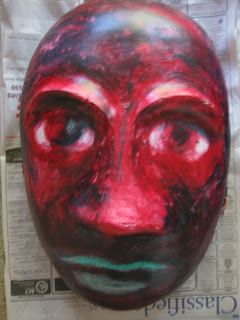
Okay so I've made the masks, had a little dabble with paint on one of them. Time to make a commitment. My favourite colours are Prussian Blue, Permanent Alizarin and Pthalo Green. I also have a fabulous orange and combined that with Prussian Blue.

Here is what I did with them.

Alizarin::


add pthalo green,

Eek! Mouth is awful. Off with it.

Prussian Blue::


Pthalo Green::


add Cadmium Orange,


add Prussian Blue.


I think that'll do.